Connecting Hyperproof to ServiceNow
Roles and permissions
Only administrators can configure the ServiceNow integration for their organization
Before configuring the connection to ServiceNow, be sure that you have met all of the permissions requirements for your ServiceNow administrator and user accounts. See ServiceNow permissions.
Each Hyperproof user can connect to only one ServiceNow account. This can cause an issue when you configure the connection to your ServiceNow admin account, because it must be a read-only account for security reasons. The read-only setting limits the usage of the integration for that Hyperproof user.
To resolve this issue, create a separate service account in Hyperproof under Settings > People to configure the admin connection to the ServiceNow admin account with read-only permissions. This allows individual users to use their personal ServiceNow connections to connect Hyperproof tasks to ServiceNow tasks and have the same permissions in both systems.
Using an admin account versus a user account
When setting up your ServiceNow integration, use a ServiceNow administrator account and credentials. These credentials are saved in Hyperproof to set up the integration, provide information for certain fields in the task window, and map task statuses between the two systems.
The Hyperproof service account user that is logged in and initially configures the admin user account for the integration is the sole owner of the credential settings. Other Hyperproof users can update the admin credentials.
Warning
Deleting existing integration credentials causes the associated task integrations to stop working.
Any Hyperproof user who wants to use the task integration must go to the task window and set up a task integration with ServiceNow. The first time a user links a task to ServiceNow, they are prompted to log in to ServiceNow. In this case, the user should enter their own ServiceNow login credentials, not the admin credentials.
User login credentials for ServiceNow are stored in Hyperproof, along with the Hyperproof user's information. Each user who plans to integrate tasks with ServiceNow should enter their user credentials in the task window.
If a Hyperproof user needs to update their ServiceNow credentials, they should go to Hyperproof Settings > Connected accounts. Locate the ServiceNow task integration credentials card and disconnect. After disconnecting, return to the task window and initiate a ServiceNow interaction. The system prompts them for their ServiceNow credentials, allowing them to enter the new updated credentials.
Connecting Hyperproof to ServiceNow
From the left menu, select Settings.
From the Settings menu, select Integrations.
On the Integrations page, select ServiceNow.
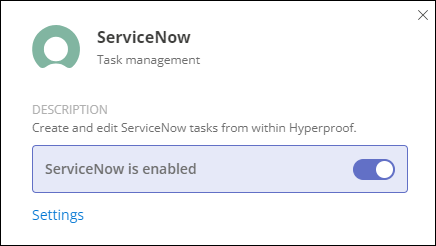
The ServiceNow window displays.
Toggle the button next to ServiceNow is disabled to enable it. If ServiceNow is already enabled, you can skip this step.
At the bottom of the window, click the Settings link to continue the setup process.
The setup page displays.
Click the New connection button.
The Create connection window displays.
In the Instance field, enter the name of your ServiceNow instance. It is derived from the URL that displays when you are logged in to ServiceNow. For example, if your ServiceNow URL is
https://megatech555.service-now.com, your instance name ismegatech555.In the Username field, enter your administrator or service account username.
In the Password field, enter the password for your administrator or service account.
Click Submit to save the connection.

The connection displays on the setup page.
See Mapping Hyperproof and ServiceNow task statuses to continue configuring your ServiceNow integration.